How to capture HTTPS traffic from iOS app with company VPN
If you're iOS developers, it's likely that your company requires a corporate VPN to access internal services, or dev/stagging servers.
However, corporate VPNs are notorious for blocking any HTTP/HTTPS traffic that is not explicitly allowed.
In this tutorial, we'll show you how to capture and intercept HTTPS traffic from iOS app with company VPN.
Here is what we achieve in this tutorial:
- Download and Setup Proxyman macOS / Windows / Linux
- Setup Atlantis on your iOS app
- Capture and inspect HTTPS traffic from your iOS app with Proxyman with active VPN.
VPNS with works with Mitm Proxy app, like Proxyman:
Fortunately, some VPNs has a setting to explicitly allow HTTP/HTTPS traffic. Here is the list:
- TunnelBlick: Work out of the box. No setting needed.
- FortiClient: Work if set HTTP Proxy to Proxyman
- AnyConnect: Setting requires a bit of configuration.
- Pulse Secure and GLobal Protect VPN: Complicated configuration.
- Viscosity: Some configuration is required.
- Cisco VPN: Proxy Settings required.
- NordVPN: Proxy Settings required.
- Zscaler: There is a workaround to make it work.
You can find detailed instruction for each VPN at VPN Documentation
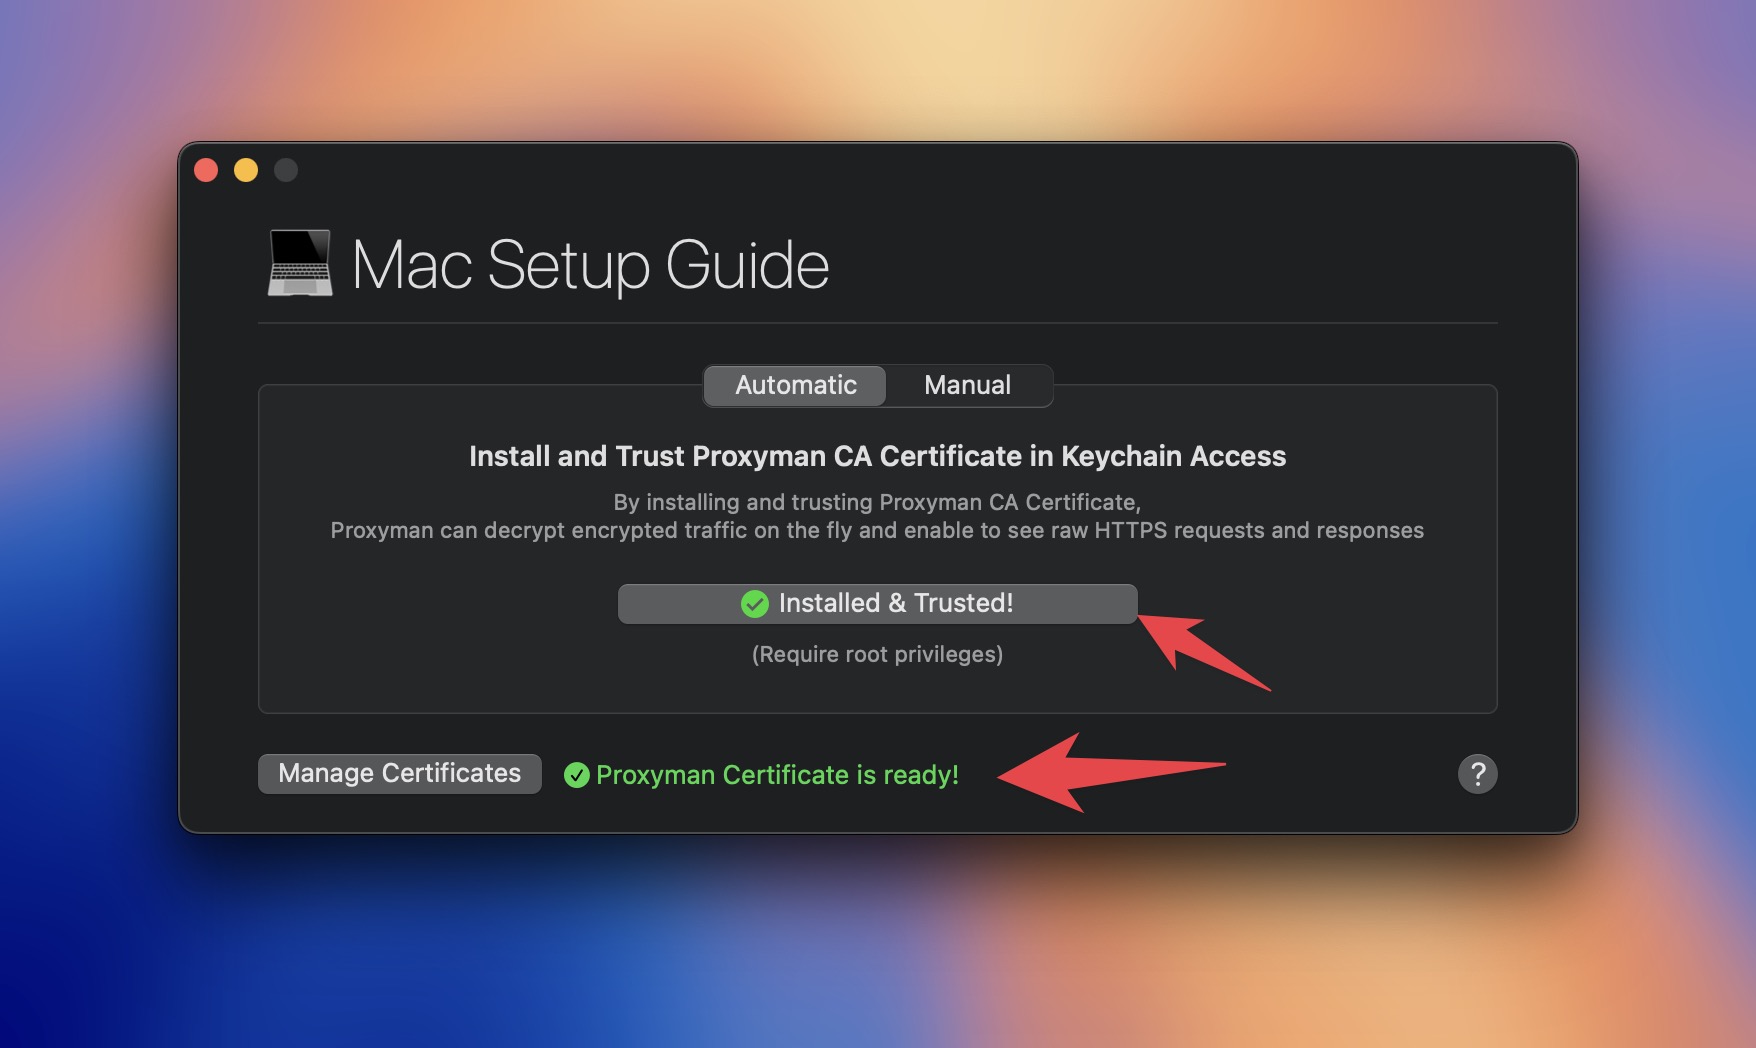
1. Download and Setup Proxyman macOS
- Download Proxyman macOS from Proxyman website. Atlantis only works with Proxyman macOS.
- Install Proxyman
- Open Proxyman -> Certificate Menu -> Install Certificate for this Mac...
- Follow the instruction to install the certificate
- Verify the green checkmark on the Proxyman certificate
2. Why we need Atlantis?
Atlantis doesn't use a Proxy, so it's working with any VPN.
Some benefits of using Atlantis:
- No need to setup Proxy or install any certificateon your iOS device
- ✅ Work with any VPN, including corporate VPNs
- Capture HTTP/HTTPS and WebSocket traffic from your iOS app
- Work with iOS Simulator and real iOS devices
3. Setup Atlantis on your iOS app
Before we start, make sure you read the README of Atlantis and follow the instruction.
Here is the step to integrate Atlantis to your iOS app:
- Add Atlantis to your project via Swift Package Manager at
https://github.com/ProxymanApp/atlantis - Add required permission to your
Info.plistfile:
<key>NSLocalNetworkUsageDescription</key>
<string>Atlantis would use Bonjour Service to discover Proxyman app from your local network. Atlantis uses it to transfer the data from your iOS app to Proxyman macOS for debugging purposes.</string>
<key>NSBonjourServices</key>
<array>
  <string>_Proxyman._tcp</string>
</array>
Here is sample Info.plist file: Info.plist
- Start Atlantis:
- SwiftUI:
import SwiftUI

#if DEBUG
// 1. Import Atlantis
import Atlantis
#endif

@main
struct AtlantisSwiftUIAppApp: App {

  init() {
      // 2. Connect to your Macbook
      #if DEBUG
      Atlantis.start()

      // 3. (Optional)
      // If you have many Macbooks on the same WiFi Network, you can specify your Macbook's name
      // Find your Macbook's name by opening Proxyman App -> Certificate Menu -> Install Certificate for iOS -> With Atlantis ->
      // Click on "How to start Atlantis" -> Select "SwiftUI" Tab
      // Atlantis.start("Your's Macbook Pro")
      #endif
  }
}- UIKit:
#if DEBUG
import Atlantis
#endif

func application(_ application: UIApplication, didFinishLaunchingWithOptions launchOptions: [UIApplication.LaunchOptionsKey: Any]?) -> Bool {

  #if DEBUG
      // 2. Connect to your Macbook
      Atlantis.start()

      // 3. (Optional)
      // If you have many Macbooks on the same WiFi Network, you can specify your Macbook's name
      // Find your Macbook's name by opening Proxyman App -> Certificate Menu -> Install Certificate for iOS -> With Atlantis ->
      // Click on "How to start Atlantis" -> Select "SwiftUI" Tab
      // Atlantis.start("Your's Macbook Pro")
  #endif

  return true
}
4. Start your iOS app with your company VPN
- In Xcode, select your iOS simulator or real iOS device and start the app. You can use any VPN you want on iOS device or Macbook.
- Open Proxyman macOS app: All HTTP and HTTPS traffic or WebSocket traffic is automatically captured and displayed in Proxyman.
- For example, we have a request to
https://httpbin.org/get

- ✅ Done!
5. Capture WebSocket traffic?
Fortunately, Atlantis also works with WebSocket traffic and it works out of the box with any VPN.
If your app makes a WebSocket request by using URLSessionWebSocketTask, it will be captured by Proxyman.
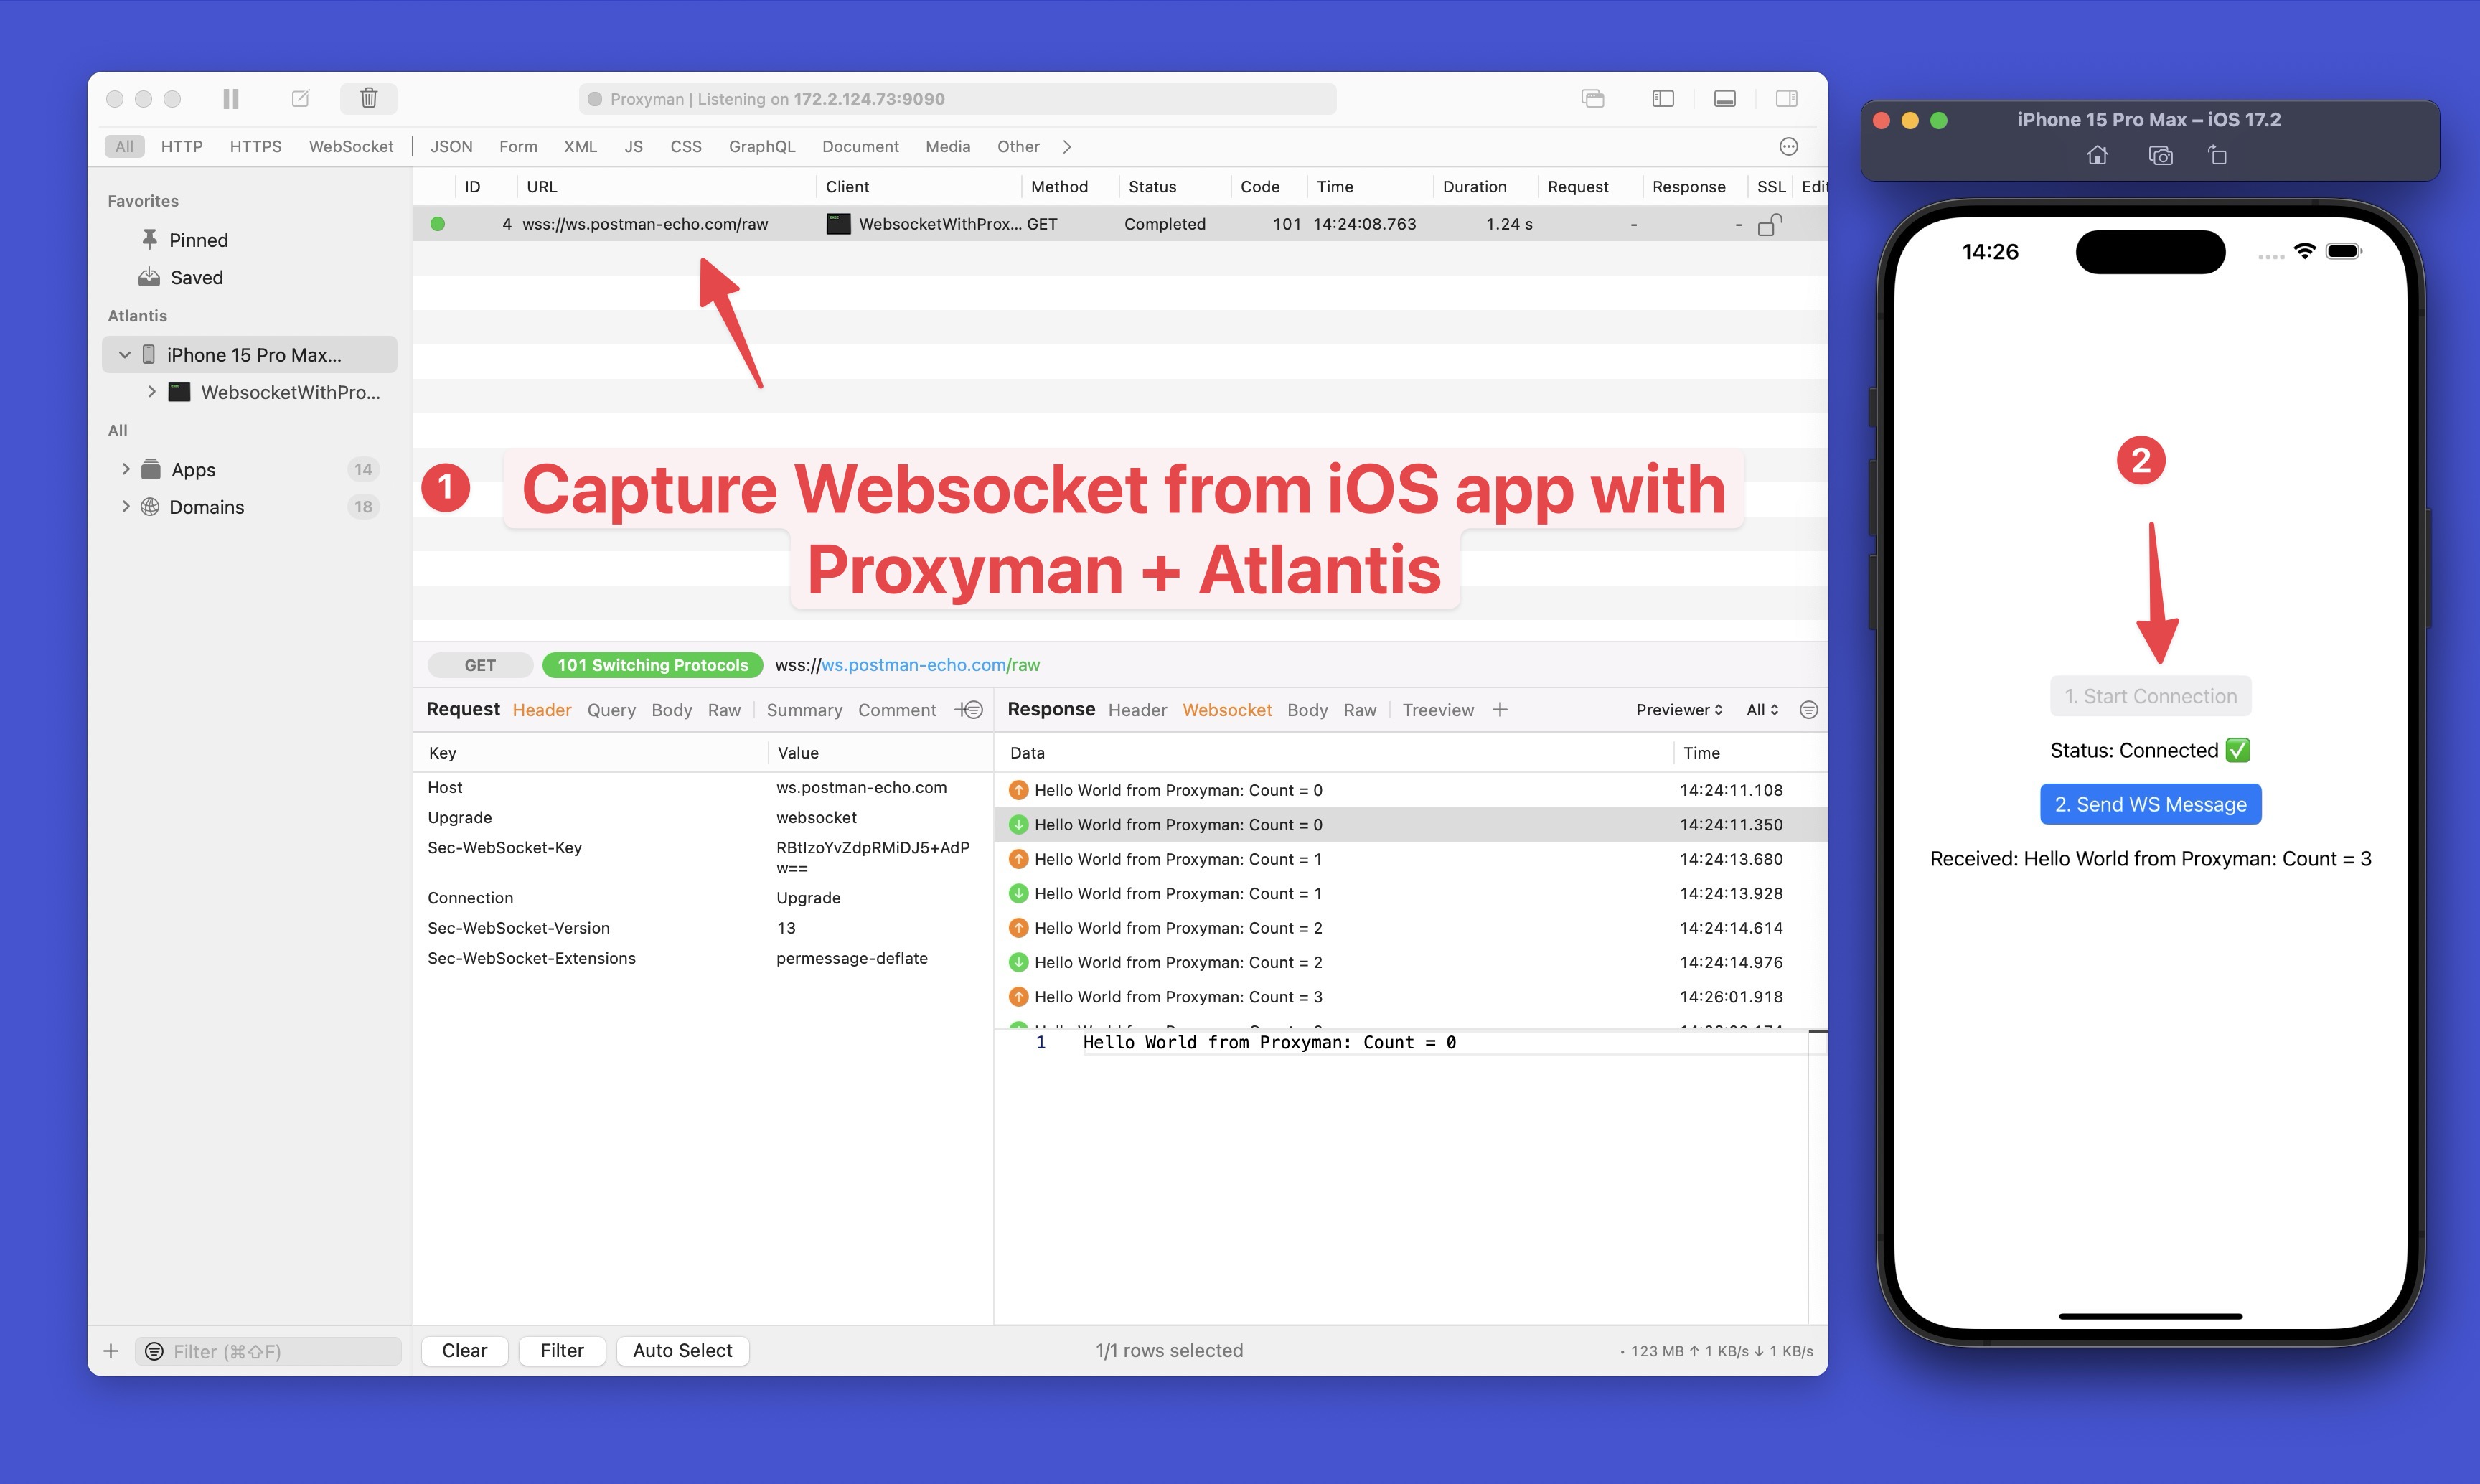
Here is the Websocket Sample App
Atlantis only works with URLSession or any library that uses URLSession under the hood. For example, it works with Alamofire.
If you're using custom Network Stack, which is not a URLSession, it won't work.
What's next?
- If you have any questions, please join our Discord community
- If you need help, please contact us at support@proxyman.com
- If you want to contribute to Atlantis, please check out the contribution guide
Read more
- How to capture HTTP/HTTPS traffic from iPhone iOS 26 or iPadOS 26
- How to capture WebSocket traffic from iOS app
Proxyman is a high-performance macOS/Windows/Linux app, which enables developers to capture HTTPs traffic on iOS device, iOS Simulator and Android devices.
Get it at https://proxyman.com